
DNA Gel Stain Selection Guide
In nucleic acid gel electrophoresis imaging, choosing a stain that matches your imaging system’s optics is key to obtaining high-contrast, low-background bands. GelRed and GelGreen were designed as safer alternatives to ethidium bromide, showing lower cell permeability and undetectable mutagenicity at common working concentrations. The two differ in excitation/emission spectra, optimal light sources, filter compatibility, and impact on downstream applications.
I. Basic principles
1.Binding mode: Both primarily intercalate into double-stranded DNA. GelGreen is generally thought to have additional electrostatic interactions that aid binding.
2.Molecular design: Both can be viewed as two intercalating moieties linked by a connector to increase aqueous solubility and reduce cell permeability at working concentrations.
II. Chemical structures and fluorescence
Both dyes consist of “two intercalating units + a linker”:
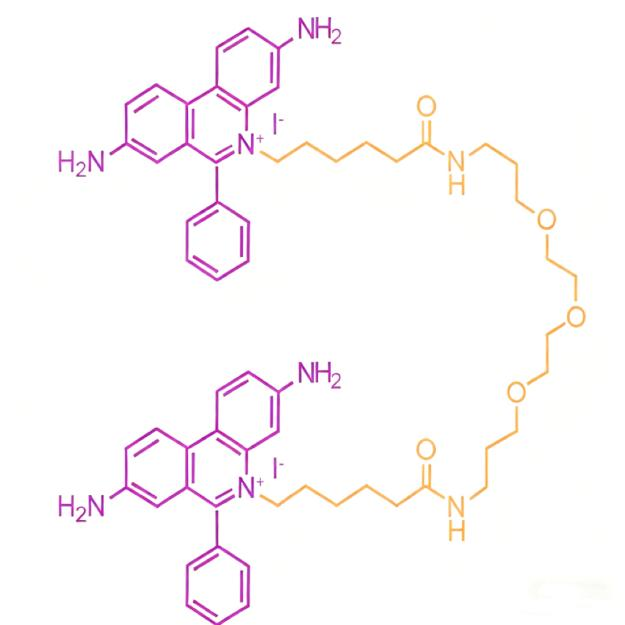
Figure 1. Chemical structure of GelRed
1.GelRed: two ethidium subunits → orange-red emission.
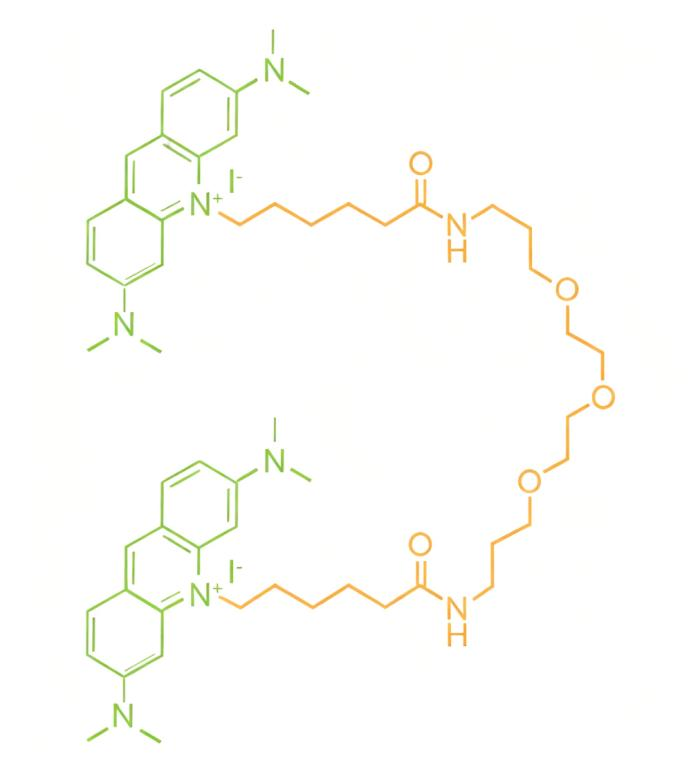
Figure 2. Chemical structure of GelGreen
2.GelGreen: two acridine-orange subunits → green emission.
III. Comparative excitation/emission spectra and compatibility
Dye type | Typical excitation peak | Typical emission peak | Best imaging system | Notes |
Red-emitting | Near-UV (~300 nm) | ~593 nm (orange-red) | UV transilluminator | Compatible with most EtBr filter sets |
Green-emitting | ~500 nm (blue light) | ~528 nm (green) | Blue-light transilluminator | More favorable for downstream DNA recovery and cloning |
Notes:
1.If your lab mainly uses a UV system with EtBr filter sets, GelRed is usually more suitable.
2.If you can use blue light or prioritize DNA integrity and reduced operator exposure, choose GelGreen.
IV. Workflow comparison: pre-cast vs post-stain vs sample pre-mix
1.Pre-cast
1) Method: Add dye to molten agarose → cast gel → run → image.
2) Pros: Fewer steps, fast, good for high-throughput screening.
3) Considerations: More sensitive to light source/filter matching and mixing uniformity; if background is high or low-abundance bands are unclear, switch to post-stain.
2.Post-stain
1) Method: After electrophoresis, incubate gel in staining solution with gentle shaking; briefly rinse if needed, then image.
2) Pros: Usually lower background and higher contrast; more forgiving when hardware is not optimal.
3) Fit: Works for both GelRed and GelGreen; recommended when filters are sub-optimal.
3.Sample pre-mix
1) Method: Add dye directly to loading buffer/sample.
2) Risk: May cause abnormal migration or smearing; if observed, switch to pre-cast or post-stain.
V. Sensitivity and detection limit
With matched light source/filters and an appropriate workflow, both GelRed and GelGreen can achieve low-ng DNA detection.
Influencing factors
1) Workflow: post-stain typically yields cleaner backgrounds and clearer weak bands.
2) Gel thickness: overly thick gels increase scatter/background; 4–6 mm is recommended.
3) Buffer system: ionic strength of TAE/TBE affects migration, heating, and background.
4) Exposure strategy: avoid saturation; keep strong and weak bands within the camera’s dynamic range.
5) Filters: emission center and bandwidth must align with the dye’s emission peak—this is critical.
VI. Safety and compliance
Safety overview: At gel-staining working concentrations, both are reported negative in Ames tests and show low permeation through latex/nitrile gloves; still follow standard PPE (lab coat, gloves, eye/face protection).
Light exposure: Prefer blue light; when using UV, wear protective eyewear/face shields and limit exposure time.
Waste disposal: Follow institutional EHS/environmental rules for collection and disposal regardless of vendor claims; local regulations prevail.
Storage: Protect from light and store at recommended temperatures; label prepared solutions with date and lot for traceability.
VII. Quick troubleshooting
Observation | Possible cause | Priority fix |
Bands are dim | Light source or filters mismatched; underexposed; insufficient stain time | Verify stain–filter match; increase exposure or extend post-stain; check gel thickness |
High background | Uneven mixing in pre-cast; gel too thick; aged/high-ionic buffer | Switch to post-stain; use thinner gel; replace buffer; shorten exposure |
Strong bands saturate and mask weak bands | Over-exposure or excessive gain | Lower exposure/gain; if needed, capture separate high/low exposure images |
Smearing/curved bands | Pre-mix incompatibility; overheating or excessive voltage | Use pre-cast or post-stain; lower voltage and improve cooling |
Low recovery after gel extraction | UV-induced damage; over-exposure | Use blue light or long-wave UV with time limits; proceed quickly to recovery |
In summary, GelRed and GelGreen are safer alternatives to EtBr. Image quality hinges on matching dye ↔ light source/filters ↔ workflow: choose GelRed for UV platforms; choose GelGreen when blue light is available or when DNA integrity and operator safety are prioritized. If weak bands are unclear or background is high, first optimize post-staining, exposure, gel thickness, and buffer system, then consider switching dyes. For excision and downstream work, favor blue light (or time-limited long-wave UV), follow PPE/EHS practices throughout, and keep batch records to ensure reproducibility.
Aladdin: https://www.aladdinsci.com/